Getting started
Welcome to Receipts Space
After downloading Receipts Space, you can get started right away and get a first impression of Receipts Space with your first 50 receipts without registering. After registration, Receipts Space is available to you free of charge for 14 days without any limits for extensive testing.
Create your first library
When you first start the program, we create a library in which your imported files are stored - locally on your Mac.
Become a Space pro
Are you switching from Receipts 1 to Receipts Space?
How to migrate your data.
When creating the library, you set the name of the library, its storage location, the storage format, the leading currency, and relevant tax rates - and optionally a password for encryption.
The storage format of your Receipts Space library is, by default, a package with the file extension .receipts-space. In Finder it looks like a single file, but it actually contains many folders and smaller files. If you want to learn more, see the Technical documentation.
Alternatively, you can create the library as a folder. The advantage is that sync services like iCloud, Google Drive, or Dropbox only transfer changed files instead of repeatedly re-uploading the entire package.
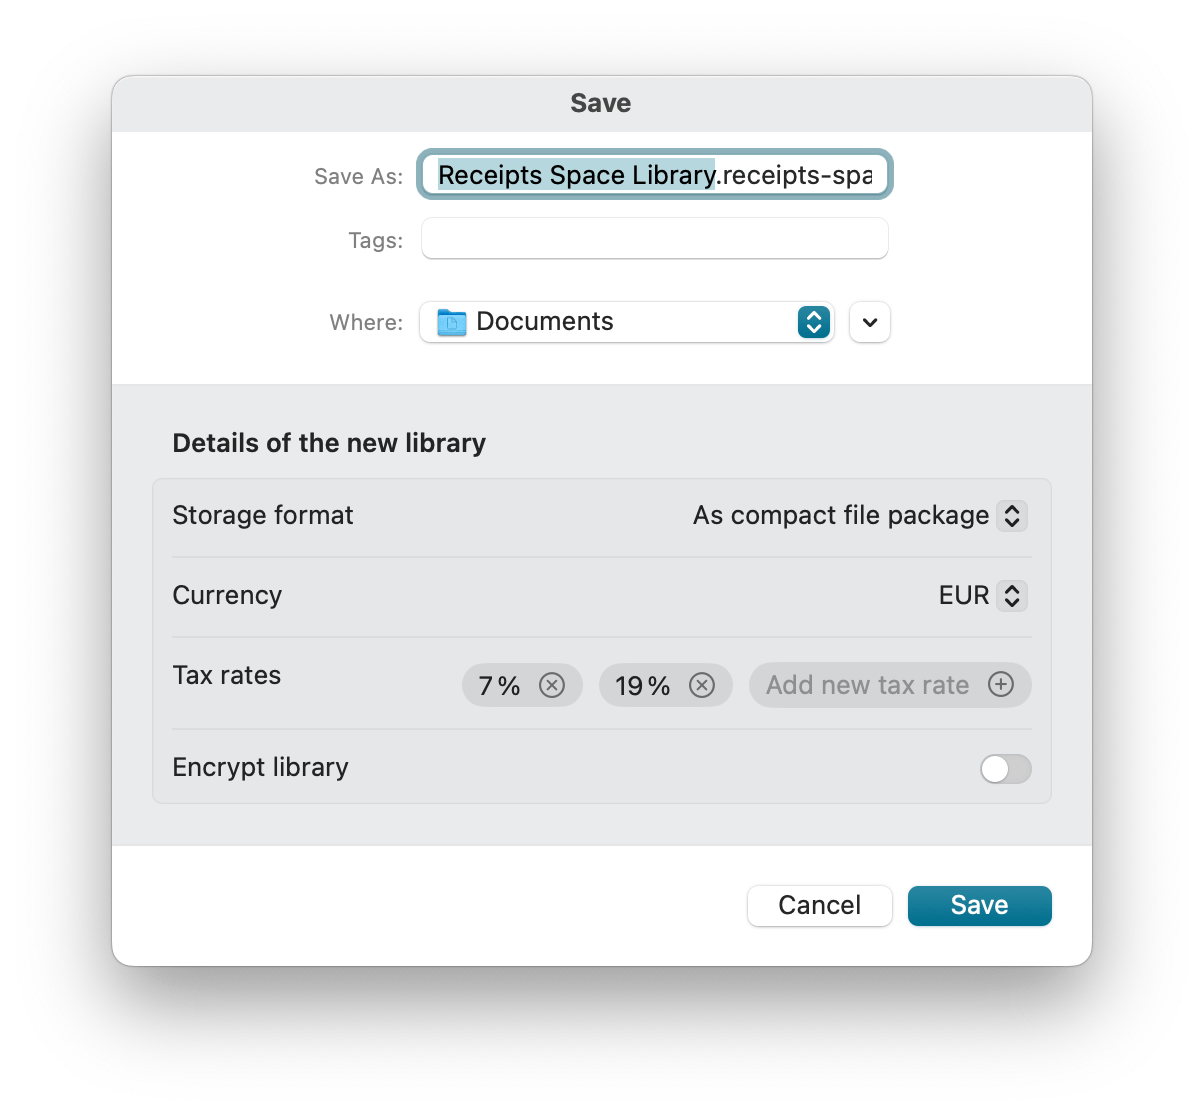
The currency is suggested based on the region set in macOS, but can only be adjusted when the library is created. The tax rates can be adjusted later.
Furthermore, you can encrypt your library if it is to be stored in a location that is not 100% trustworthy, such as in shared directories or on a USB stick.
Important
A password cannot be recovered. Store it safely. If you lose it, your data is lost.
Of course, you can also create additional libraries via the main menu. This allows you to manage several closed areas. You can also open libraries directly in Finder, for example by double-clicking.
After that, Receipts Space will always open the last library used - but only one library can be open at a time.
Become a space pro
Sometimes it happens that you want to move documents to another library. The contents of one library can be selected and copied to another. To do this, hold the respective libraries in the Finder. In library A, select the relevant document(s) and copy with ⌘ C. Then open library B and paste with ⌘ V. Do not forget to delete in library A if necessary. In some cases, references such as contacts, tags or categories must be created again.
Data security & sync
Protect your data
Receipts Space enables maximum privacy and data protection by storing your data locally. Only you determine the storage location.The file format is open and local. Your data is not stored in a cloud or “locked” in a cryptic file format. You can always access your data, even independently of the Receipts Space app, by using Finder (right mouse button) to display the package contents.
Are you interested in the details? Then take a look at the technical documentation.
Please note
However, this also means that the responsibility for the data is entirely yours! We therefore recommend that you regularly create backups, e.g. using TimeMachine.
Encryption
If you want to store your library in a location that is not 100% trustworthy (for example shared folders or a USB drive), you can encrypt it with a password. Sync across multiple devices still works as long as all devices know the password.
Encryption can only be set up or changed when creating a new library or when using Save a copy as…. If you want to change the password, you must create a new copy and continue working with that.
Important!
The password cannot be recovered! Make sure you keep it safe or remember it. If you lose your password, your data will also be lost.
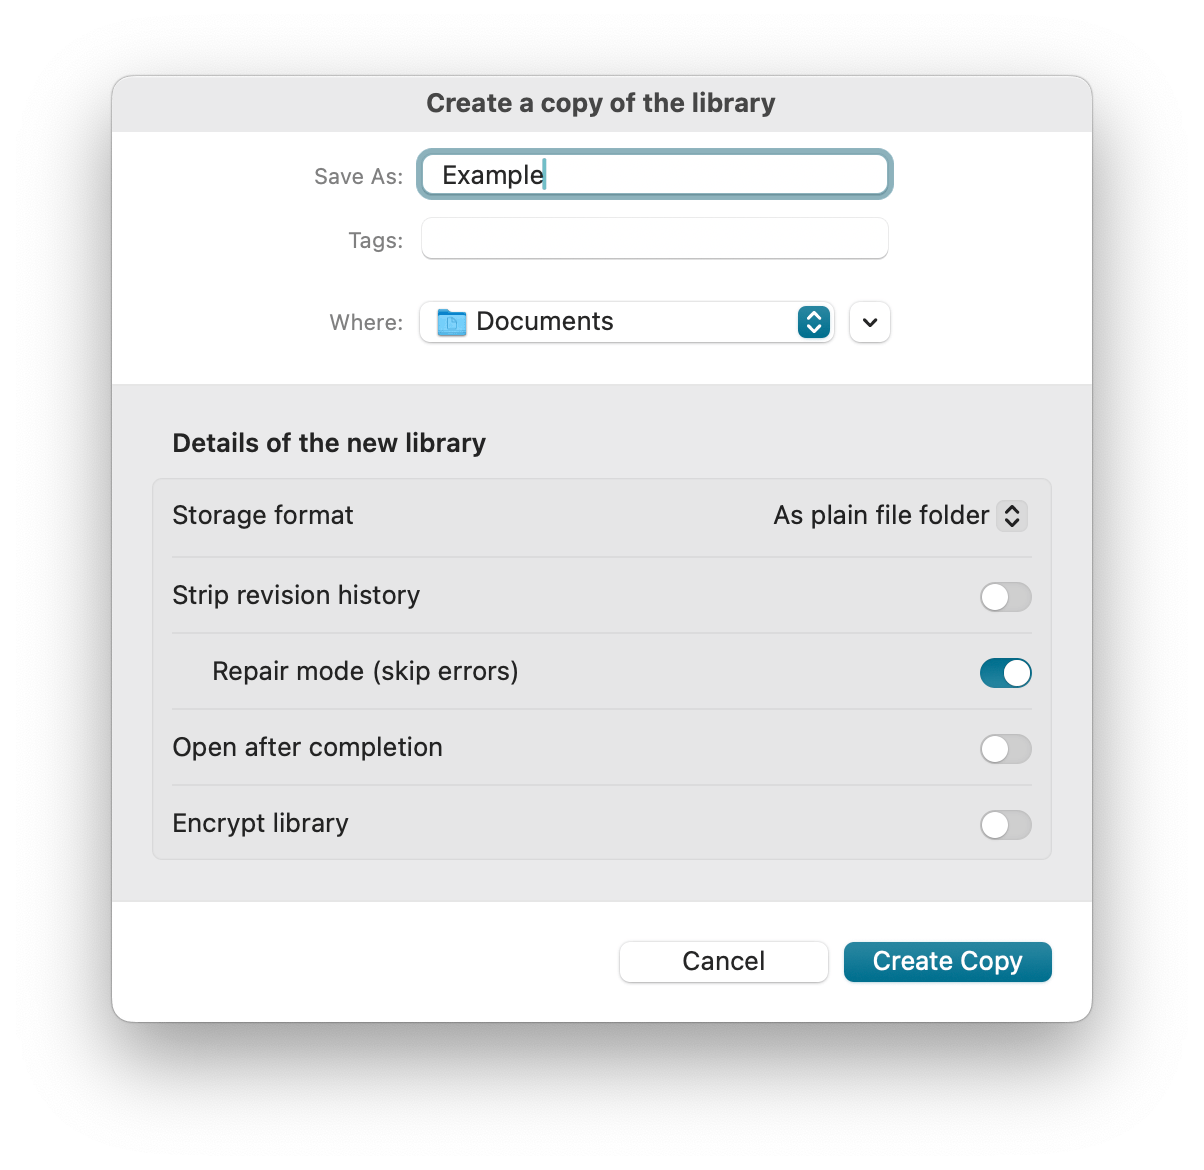
Save a copy as…
You can copy or duplicate the library in Finder and then open it at the new location.
In addition, the “Save a copy as…” feature in the File menu offers these advantages:
- Convert to another storage format: If a sync service has issues with packages, you can switch to the folder format by creating a copy.
- Remove history: Receipts Space logs every change to data and files in the library. A copy without this history and without original files can be significantly smaller.
- Change or set up encryption: For technical reasons, you can’t change the password of an encrypted library in place. Create a copy to use a new key.
- Repair a damaged library.
Changes made to a copy are not transferred back to the original library. Synchronization only happens when multiple devices access the same library.
Repair
If you encounter problems with the library or if parts of it are missing or damaged, you can repair the library. To do this, open the library, even if error messages appear. Then create a copy. It is important that you deactivate the “Remove history” option and activate “Repair mode.” Now all checks are disabled and a functional new library is written.
The following errors will be skipped:
- Checking the checksum and size of a transaction
- Checking the checksum of the previous transaction
- Incorrect data row in a transaction
- Gaps in the sequence of transactions
Why can a library be damaged?
Every adjustment is accompanied by a small change step. Unexpected termination of the app or problems with the synchronization service (iCloud, Dropbox, etc.) can cause one of the steps to be lost. We try to prevent this as much as possible, but the advantage of storing data on your own infrastructure unfortunately comes with the disadvantage of a non-100% controlled environment. However, such an error is not a big deal, because what is displayed in the app corresponds to what is actually available. The repair mode will fix things if necessary.
Sync across multiple devices
Your library must be located in a shared directory so that it can be accessed from different Macs. After you have downloaded the app from our website to your other Macs, use the same license on each of them.
Ideally, the latest version of Receipts Space should be installed on all computers.
Synchronization between different computers takes place via the library file. You therefore place the file in a shared directory to which your respective computers have access. For example, you can use iCloud, Dropbox, Google Drive or your local NAS, but also services such as Syncthing or Resilio Sync.Become a space pro
The sync is triggered automatically, but you can also trigger it manually with ⌘ S. To completely restore the local library database from the synchronization data, you can use ⌘ ⌥ S.
iCloud optimizations
For best results when syncing via iCloud, we recommend two things:
- In Finder, mark the library as “Keep Downloaded”. This keeps the current state on your Mac and reduces waiting times.
- Create the library as a folder. This helps iCloud sync only the changed files.
If you use the folder format and you don’t want to keep all documents downloaded, it can still be helpful to keep the transactions folder always available. The assets folder contains the document files and can be downloaded on demand.
Storage format: package vs. folder
Receipts Space supports two storage formats for libraries:
- Package (default): Looks like a single file in Finder (
.receipts-space), but contains many files and folders. Feel free to take a look at it by clicking on “Show Package Contents” in Finder. - Folder : Stores the same structure as a regular folder. Some sync services handle a folder better than a package. With the folder format, they can transfer only the changed files instead of re-downloading or re-uploading the entire package.
You can choose the storage format when creating a library or when using “Save a copy as…”. You will find this option in the Save dialog.
App settings
Receipts Space retrieves many settings directly from macOS. You can also configure personal app settings (for this Mac) and library settings (stored with the library and therefore shared across devices).
General settings
Open Settings in the main menu to customize the app on the Mac you are using. These settings apply to all libraries that you manage on this Mac —but only for that particular computer.
Reminders
Receipts Space reminds you at the beginning of each week that new receipts are being processed. These notifications are displayed by the operating system. In the settings and by clicking on this notification, you can adjust the timing of the reminders or deactivate them completely.
Cleanup
Some temporary data is stored locally in plain text while the app is running. If you don’t want to leave traces, you can enable “Cleanup” to delete temporary data when quitting the app. Note that this can slightly slow down opening a library the next time you start Receipts Space.
Updates
If a new stable version is available, a window appears with information on the latest changes and the option to download the new version. After your confirmation, the new version is downloaded, installed and the app is then restarted. We recommend that you always use the latest version. However, you can do this at a later date by updating in the settings. Otherwise, the update will be displayed again after a certain period of time.
Here you can also select whether these updates should be performed automatically and whether you want to be notified of available beta versions. Participating in the beta version allows you to use improvements to the app earlier. However, despite extensive testing on our part, the beta software may contain bugs. You should therefore always make a backup copy before using beta versions. It is always a good idea to create regular backups.
Text recognition
Apple Vision OCR from macOS delivers excellent results in text recognition.
Subscription management
You can also manage your subscription via the settings. You can see the current status of your subscription and can view your payments, adjust payment methods and cancel your subscription with just a few clicks.
Become a Space pro
Do you need an invoice or would you like to add data such as address or VAT ID to your invoice?
Select “Payments” on the left and then click on the relevant payment process. Here you can view the invoice and/or update it with additional information.
Please note that an invoice will only be available once the first payment has been made after the end of the free 14-day trial period.
Library settings
The settings relate to your current library and are saved with it. These settings are also retained if you open the library with other devices. If you create several libraries, you can have different settings for each library.
General library settings
In the first tab “General” you’ll find:
Display name for changes
Every time you change data, an anonymous identifier is attached to that change. Here you can enter a descriptive name, for example your own name or the name of the current device.
This label is shown next to your changes in the History.
Audit compliance (GoBD)
“Audit compliance” supports you in the proper filing of receipts and documents, as required in Germany in the GoBD.
 For each entry, you will find a history timeline at the bottom right of the document information, which lists all changes, including the date and author.
If “audit compliance” is activated, entries are confirmed as ‘completed’ and thus specially protected. With the exception of “tags,” “notes,” and “marks,” all document information fields are write-protected to prevent unwanted changes. The entry can be made writable again, but this will be logged.
Documentation
We describe how Receipts Space technically complies with GoBD requirements in the document Audit-compliance and GoBD. Please note that fully meeting these requirements may also require changes to other parts of your business processes.
Duplicate detection
By default, receipts recognized as a duplicate are not imported again. Instead, they are only marked with a square in the “Recent imports” view.
If you want duplicates to be imported again, you can disable this default behavior here.
Regardless of this, you can still duplicate an entry using the “Duplicate” function.
Automatic currency conversion
By default, foreign currencies are converted daily to the standard currency. If you take the conversion from your bank statements, for example, you can turn this setting off.
Document settings
The following conditions are stored for your documents:
Currency
You have already set the standard currency when creating the library; this can no longer be changed in this library. It has an influence on the recognition of amounts and is also used as the starting point for the automatic conversion of other currencies.
Tax rates
If you want to add the default values of the tax rates, e.g. because you often enter invoices from abroad with different sales or VAT rates, you can modify them here.
These tax rates are also displayed for input in the user interface in the receipts information, see Taxes. You can also select them for Export and Reports as Columns.
Default document type
All imports are recorded as “expenses” by default. However, per library you can choose whether new imports should be created as “Income” or “Document” instead. Imports from MoneyMoney and GrandTotal are imported with the correct type, independent of this setting.
For feature detection, you can define:
Automatically assign contact and category
Classification (automatic assignment of recognized receipts to contacts and categories) is enabled by default and can be disabled in settings.
Use invoice number as title
By default, the original file name is used as the title. If you enable “Use invoice number as title”, Receipts Space will use the invoice number as the title instead.
Detect currency
If you only have receipts in your standard currency, you can disable automatic currency recognition.
Content recognition
The number of pages to be taken into account for text recognition is set to 3 pages by default. You can make changes here and adjust the preferred date format (DMY or MDY). The default is taken from macOS settings.
Reference number template and counter
The reference number is automatically suggested and incremented after confirmation. Here you can determine the format of this number yourself by dragging and dropping the blue placeholders into the input field and adjusting them via the drop-down menu. The current counter can also be viewed and adjusted.
Become a space pro
Document numbers are character strings and not numbers. To achieve sorting, therefore, set enough zeros in the counter.
Once document numbers have been created, they can unfortunately only be changed manually.
Display settings
This tab contains settings for the relevant date, journal layout, fiscal year, and the fields shown in the receipt information.
Relevant date
By default for accrual taxation, the document date is displayed and used in lists and filters.
In practice, some especially smaller companies use cash accounting, where the date of payment is relevant. You can change this in the settings or via the context menu in the journal.
Journal
Your receipts are displayed in the journal according to time criteria. Depending on the setting, the document or payment date is used as the relevant date.
The top level consists of calendar years, below which one of the following structures appears, which you can customize in the library settings or in the main menu under Display > Journal:
- Months
- Quarters
- Tertials
- Semesters
- Calendar weeks
Customize the layout of the journal via the context menu in the journal itself as well as in the main menu.
Fiscal year
You can adjust a fiscal year that differs from the calendar year here.
Display
You can customize the layout of the receipts information (see Input) on the right and the selection of the Sidebar on the left via Display. Your selection will then be applied to both displays.
Folder
Observed Folders
No rule without exception: These library settings apply exclusively to this computer. Other computers accessing the same library can observe other folders.
To simplify the regular import of documents, you can use observed folders: Click on + at the bottom left to add a folder. Similarly, click on - to remove it again. You can also drag the entire folder onto the app: You will then be prompted to activate folder monitoring.
If you place a new file in this folder or one of its subfolders, it will be imported unless it is a duplicate. If Receipts Space is running, the import takes place after about 10 seconds, otherwise the next time the app is started.
The options are varied and allow you to create convenient workflows, e.g. when folders are monitored in the iCloud or Dropbox. Another good example is the direct processing of documents via smartphone. You can also directly transfer keywords/tags from folders.
Files from observed folders can also be automatically deleted directly after import. This option is only shown if the observed folder is empty. This restriction is necessary so that an entire existing folder is not unintentionally deleted during import. The successfully imported files are moved to the macOS Trash. If there is no Trash available (for example on a network drive), the files are moved to the hidden folder .ReceiptsTrash in the same directory.
Direct payment
If you would like to use the recognized bank details of your incoming invoices for the export in SEPA format to online banking, you can enter your own bank details here.
You can find further information under: Online Banking.
You can set up your individual transfer texts under Templates.
Templates
You can define templates for the individual compilation of file names and printouts for Export and transfer texts for direct payment.
There are placeholders on the right-hand side, which you can drag into the corresponding fields with the left mouse button. Some placeholders, such as the date, allow you to make additional adjustments, such as the date format, via an included drop-down menu.
Any text can be entered before, after and between the placeholders. In the template for file names, the use of the / character causes corresponding subfolders to be created.
Logbook
Important events related to loading and saving your data are logged here. For important events, a warning also appears in the sidebar on the left. In most cases, the logbook contains guidance on how to fix the issue.
Import your receipts
Migration from Receipts 1.x
Basic import methods
Drag and Drop
You can import files or data from most other programs simply by dragging them onto the Dock icon or the Window of Receipts. The following formats are supported:
- e-invoices (XML, XRechnung, ZUGFeRD, EN 16931)
- images (JPG, PNG, HEIC, …)
- e-mails
- websites
The file name is used as the title when importing.
In addition, the container formats .receipts-import (JSON) and .receipts-package (bundle of a JSON manifest plus asset files) are recognized. See Interfaces for the full schema.
You can also drag entire folders onto the app. These are imported recursively with all subdirectories. The first time, you will also be asked whether they should be observed.
Become a space pro
Sometimes dragging does not work straight away, e.g. with file icons in window titles. Simply hold the file for a few seconds after clicking before you start dragging.
File dialog
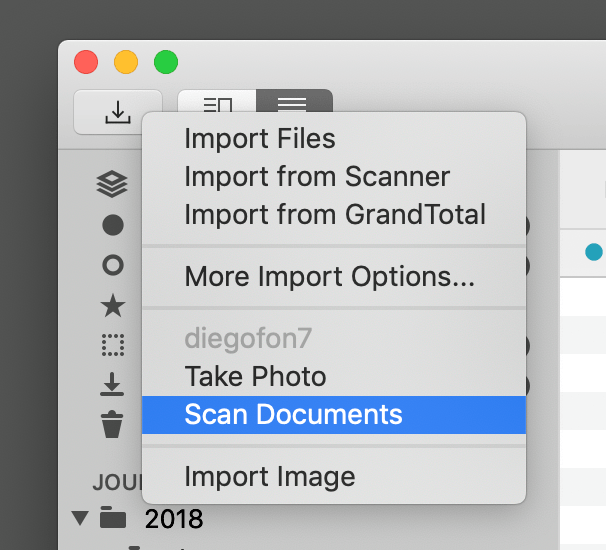
Via the main menu Insert - Import or via the symbol in the toolbar you can open a file dialog where you can select files to be imported.
Observe Folders
File folders can be monitored so that every change is automatically imported. For more information, see Settings “Observed folders”.
Mobile & scanner
Smartphone or tablet
Use your smartphone - iPhone or Android - or iPad to capture your receipts on the move. You can use document scanner apps for this. Services such as Dropbox or iCloud Drive can be used for synchronization.
If you observe this folder on the computer on which Receipts Space is also located, the import into Receipts Space takes place completely automatically. Very practical for on the go.
https://video.holtwick.de/w/cCbVvRGKhAbBCv5RVU1NoTContinuity Camera
 Moreover, you can use the camera on your iPhone or iPad to capture documents via the local network. To “activate” the document scanner from iOS or iPadOS, both devices - your Mac and iPhone or iPad - must be on the same Wi-Fi network and have Bluetooth switched on.
Further details on the Continuity Camera or integration camera can be found at Apple.
Scanner
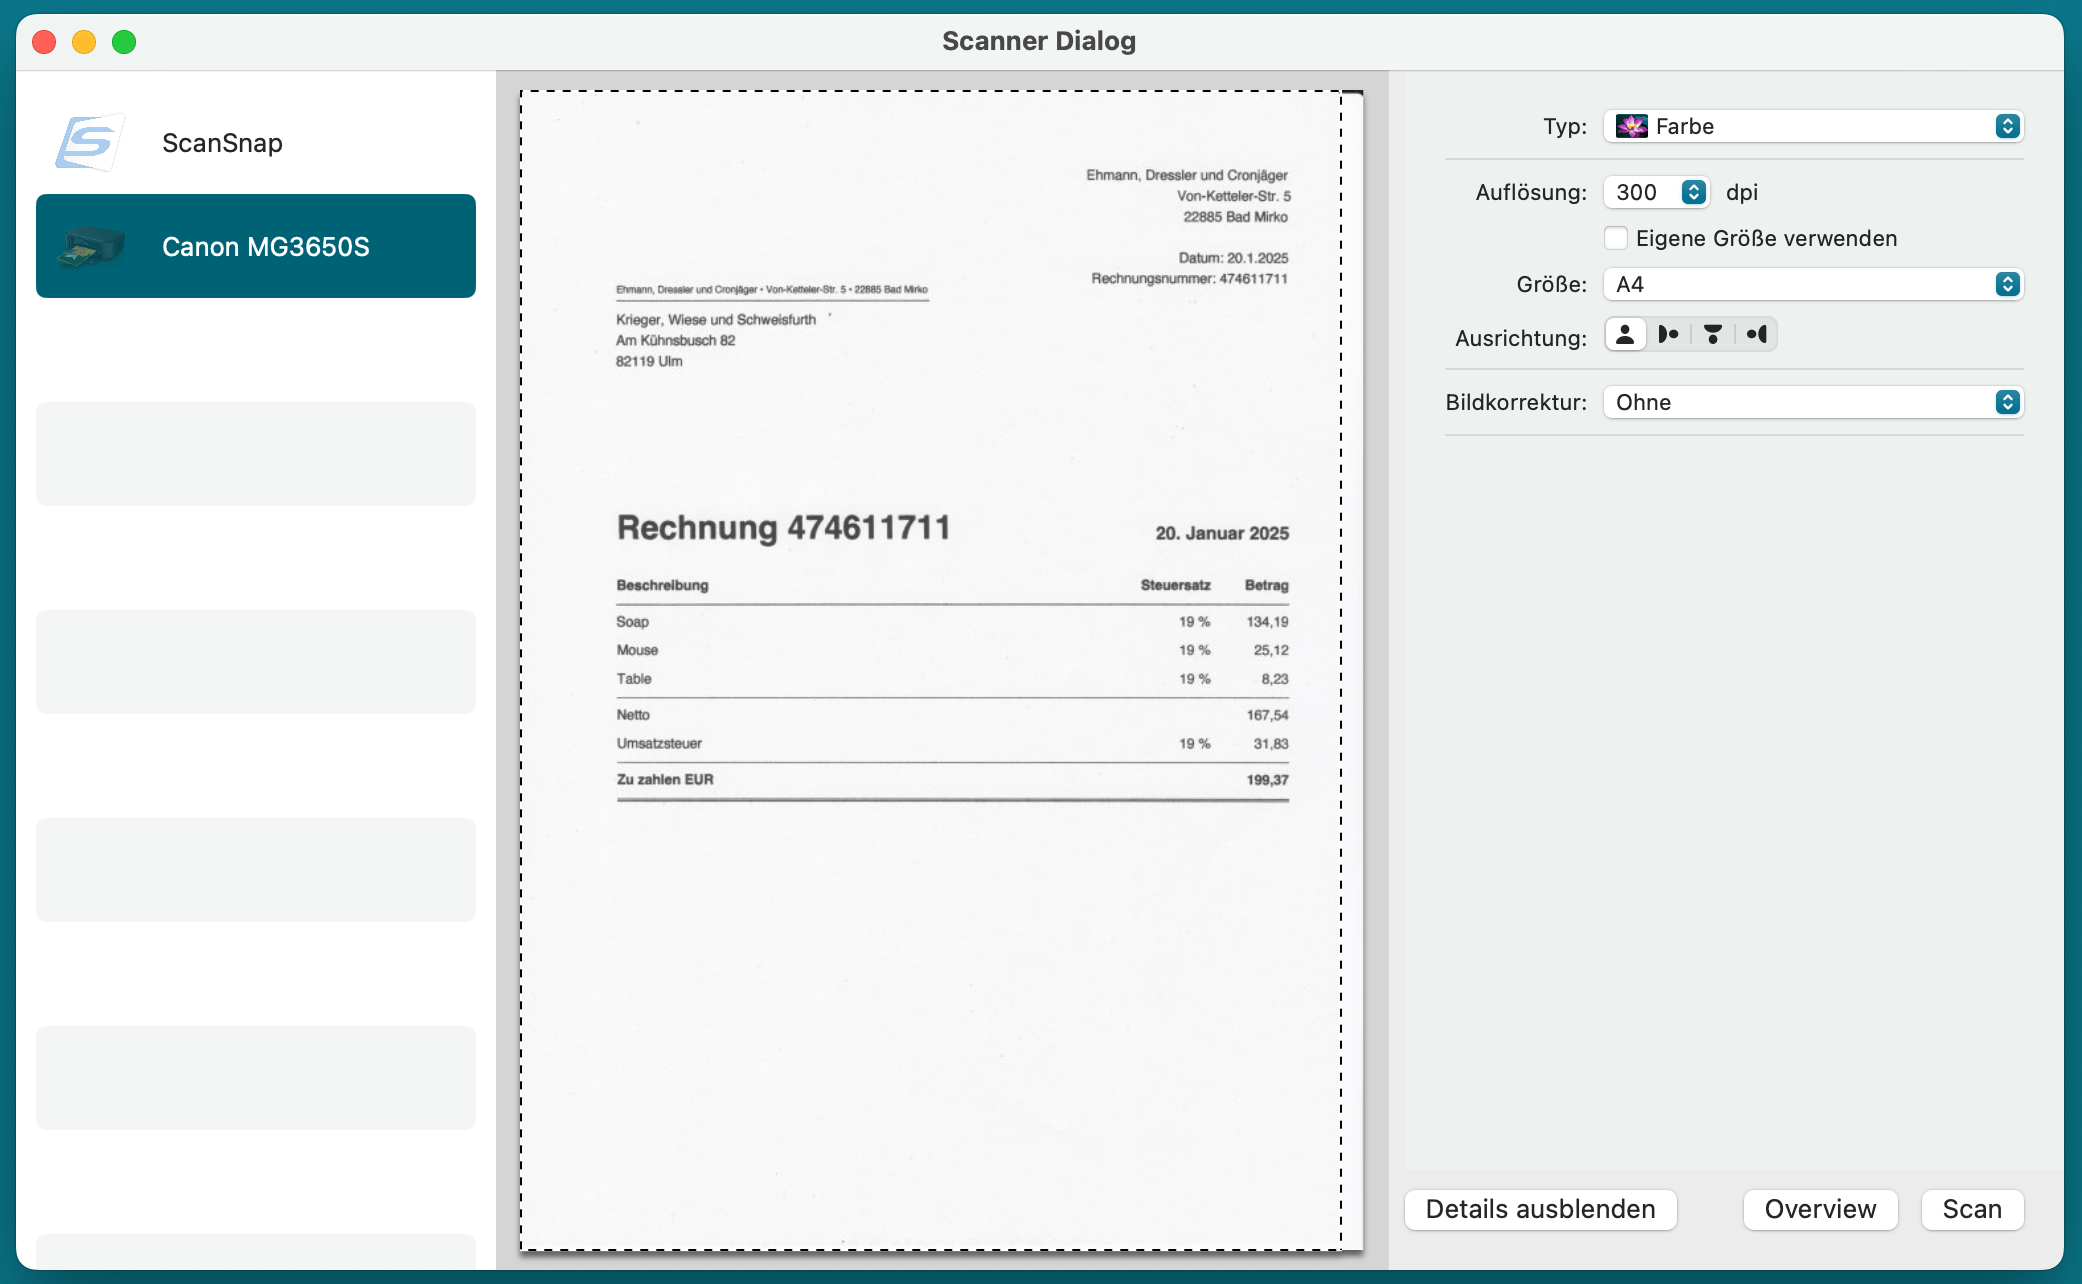
Receipts Space offers you a convenient scanner dialog. All available devices are listed in the left-hand column. After selecting a scanner, the interface familiar from macOS appears.
You can choose between a simple and a detailed mode. The former is useful if you do not want to scan a preview every time. The latter allows more advanced settings.
Each scanned page creates a separate document and text recognition is performed automatically.
Become a space pro
To achieve optimum results in text recognition, we recommend scanning with at least 300 DPI and in color. Otherwise, the higher the resolution, the better for text recognition.
 ScanSnap
For larger volumes of documents, a document scanner, e.g. a ScanSnap from the manufacturer FUJITSU, is recommended.
The device is controlled by the manufacturer’s own software and therefore does not appear in the built-in scan dialog of Receipts Space. You can of course import the generated files into Receipts Space using the Import functions already described. Observed folders can simplify the process.
Become a Space pro
Alternatively, you can adjust the ScanSnap software settings so that documents are sent directly to Receipts Space. This makes your work much easier when you have a lot of documents.
The following video shows how to integrate Receipts Space directly into ScanSnap Home.
https://video.holtwick.de/w/3JzGiAN2bP6vHear9ZxcA5Email integration
Email import
You can easily import emails by drag-and-drop from the mail program onto the Receipts Space window or dock icon. These are stored and analyzed both in the original and in the form of a PDF file - particularly practical for invoices in Apple’s mail format.
If the email contains a PDF attachment, this is imported. In rare cases, the content of the email is the document, but there is still an attachment such as the terms and conditions. Here you can prevent the usual PDF import by holding ⇧ or ⌘ during drag-and-drop import.
 Apple Mail automation
You can automate this process for frequently recurring emails. To do this, create new “Rules” in Apple Mail via “Settings”, e.g. one that looks for “Your invoice from Apple” in the subject line. Then select “Perform AppleScript” and “Send to Receipts Space” as the “Action”.
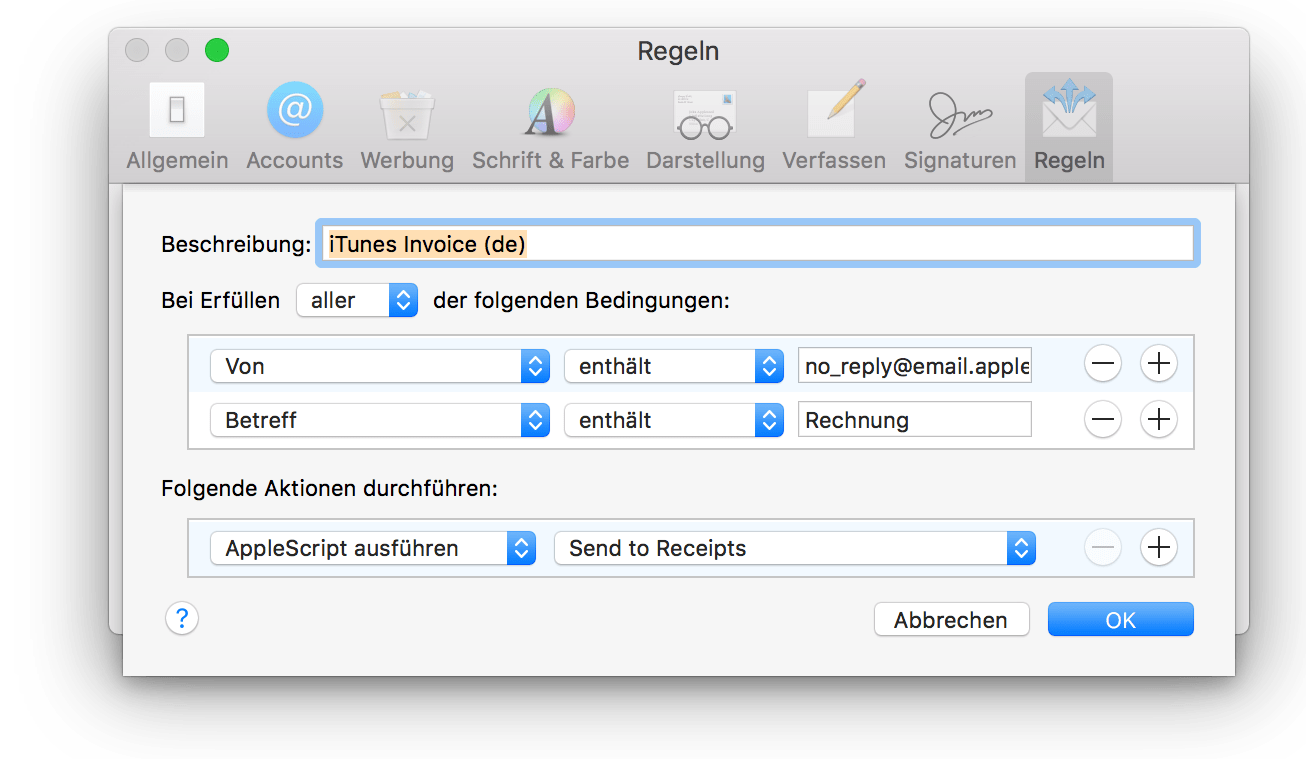 As soon as an email matching this rule arrives, Receipts Space is called up for import. If the email does not contain a PDF as an attachment, the content of the email is converted into a PDF and saved in Receipts, which is useful for iTunes and Google Play invoices, for example.
Apple AppStore Version
For technical reasons, Receipts Space from the AppStore cannot copy the script to the correct location itself. Therefore, please select “Open in Finder” in the dropdown to select the script and copy the following script there:
Download Apple Mail script for Receipts Space from the AppStore.
Other import options
Print Dialog
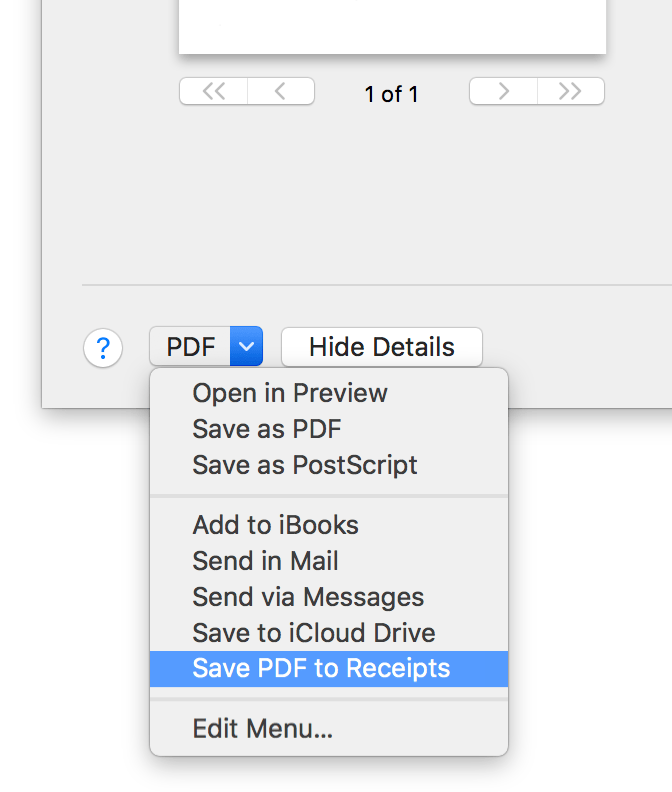 You can import your receipt directly into Receipts Space via the print dialog using the “PDF” button at the bottom left.
Become a Space pro
If the entry does not yet exist, you can easily create it yourself. Simply click on “Edit menu…” go. Then click on the + sign and select the Receipts Space app in the Applications folder. Now the function can be used as described.
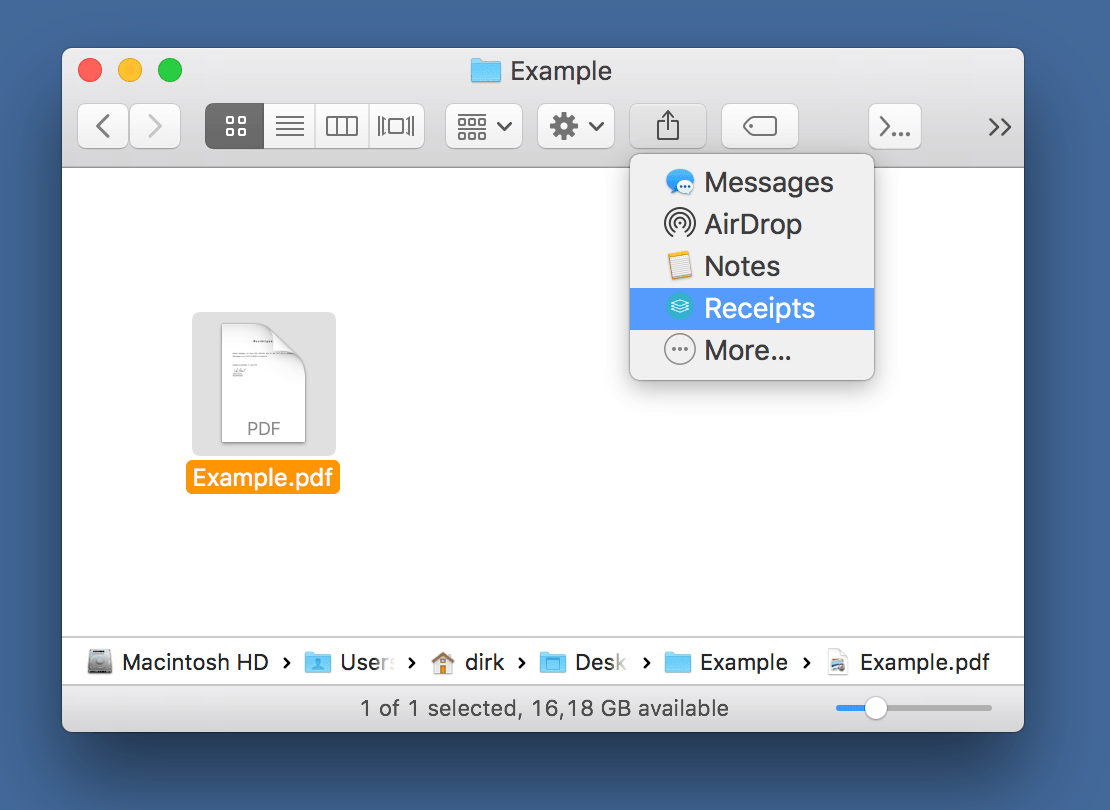
Share Dialog
In other programs, you can use the “Share” function to import documents into Receipts Space.
If you enter a text in the dialog box before posting, it will appear in the “Notes” field.
 GrandTotal (import outgoing invoices)
There are several ways to import invoices created with GrandTotal into Receipts Space:
- Select entries in GrandTotal and then drag and drop them to Receipts Space.
- Select
Files > Send To > Receipts Spacefrom the GrandTotal main menu. Select and confirm the period in the following dialog. - From the Receipts Space main menu, select
Files > Import from GrandTotal. All invoices are imported, existing invoices are updated if necessary.
Outgoing invoices from GrandTotal are automatically recorded as receipts.
 Placeholders from MoneyMoney
Bookings from MoneyMoney can be imported directly into Receipts Space using drag and drop to create so-called placeholders. These entries contain all usable information from the booking except the receipt itself. This can be added by dragging a document onto the placeholder area.
Special cases when importing
E-invoices
All your receipts are saved as searchable PDF files in your library. The original file (e.g. for emails) is also saved.
If you receive a ZUGFeRD file, this is saved in your library. The document information of the e-invoices is then read securely without having to use text recognition.The relevant information is also captured from an exclusively machine-readable XML invoice and a PDF invoice is generated in ZUGFeRD format, which you can then also read, and then stored in full with the embedded XML file.
File attributes
When importing, in addition to the file name as title, the keywords/tags and comments (as a note) of the files and the parent folders are also transferred. In this way, some attributes can be conveniently defined automatically at file level using Finder. This is particularly useful in combination with the observed folders.
Duplicates
Of course, it can happen that you accidentally want to re-enter receipts that have already been imported. To avoid duplicates, Receipts Space checks whether files are identical. A check for duplicates can only be carried out on the basis of identical data, not on the basis of identical content. This means that if you photograph or scan the same document several times, the content is the same, but the files are not. For example, the creation date and time are different. This cannot be recognized as a duplicate.
 Duplicates recognized during manual import are not imported again. However, existing documents are transferred to the “Current imports” view and marked there with a “square” symbol to inform you of the duplicate.
If the existing receipt is in the Trash, the entry is restored by another manual import process and listed in the “Current imports”. However, the “Added” date (time of import) is not updated and the document is not marked as a duplicate.
Documents that have already been imported are also not imported from a “observed folder”. They are also not listed in the “Current imports” view, but remain in the “observed folder” (even if this is to be deleted after the import).
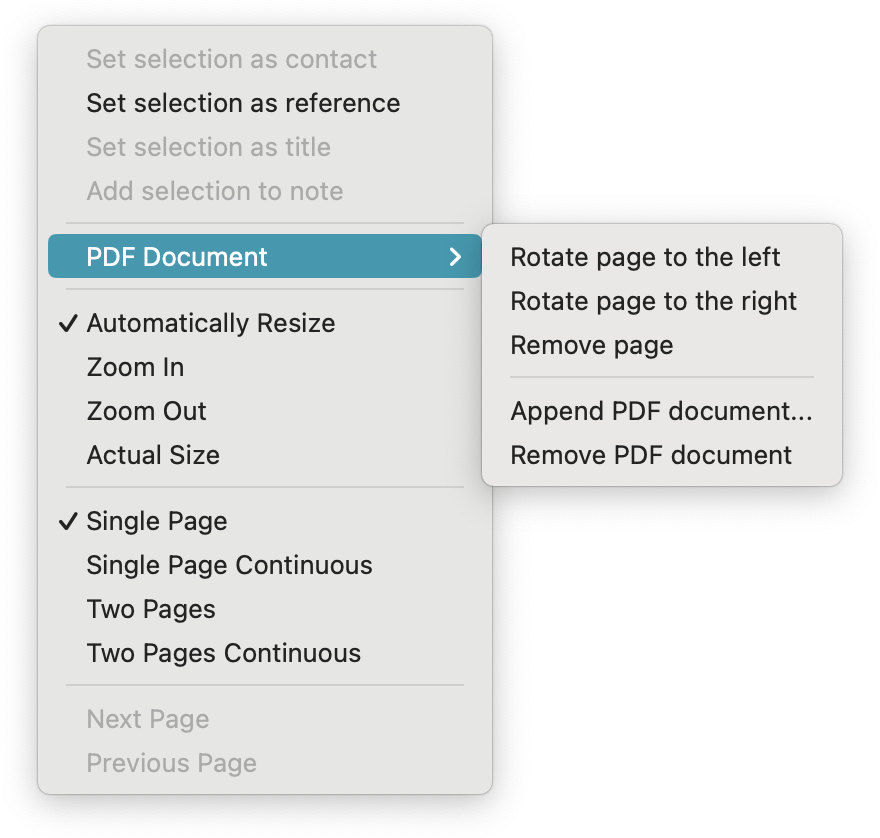
Edit PDF pages
You can edit the PDF using the context menu in the document view:
- Rotate page left or right
- Remove page
- Attach another PDF document
- Remove current PDF, a placeholder is visible
The various display options for the PDF are now prominently displayed at the bottom of the PDF as soon as you are in this area. This also makes the PDF manipulation functions easier to access.
Merge receipts
A frequently requested feature is merging multiple receipts into one. The PDFs are appended and keywords/tags are merged. The old entries are moved to the Trash. This feature is not available in audit-compliance mode.
Enter your receipts information
Automatic text recognition with content analysis and self-learning classification of receipts make it much easier for you to capture receipt information.
Automatic recognition
Text recognition (OCR)
Optical Character Recognition (OCR) converts printed or handwritten text from images or documents into machine-readable text. The process begins with the capture of an image, followed by analysis to identify areas of text. Once recognized, the characters are converted to digital text and stored.
Content analysis
Receipts Space automatically recognizes content that has a certain shape and enters the most plausible values in the corresponding fields. These are highlighted in color:- Document Date (Date)
- Total Amount and Taxes (Monetary amounts)
- Bank Details (IBAN)
If the correct values have not been entered, you can quickly correct them by clicking on the locations highlighted in different colors in the document. By holding ⌥ it is possible to also set the tax amounts in this way.
Auto-assign contact and category
Common characteristics are searched for between the documents so that already recorded contacts are automatically assigned to new documents. If only one category has been set for the contact, this will also be assigned.
Receipt information
Document type
As a basic setting, Receipts Space assumes you primarily capture incoming invoices, so each receipt is initially assigned the document type “Expense”. You can change the default in the library settings if you mostly have outgoing invoices or documents.
In addition to income and expenses, you can also capture documents as a document type and thus keep contracts, SEPA mandates, policies, etc. in your library. With the exception of payment-related information such as amount and VAT, you can fill in fields such as contact, category, keywords/tags and notes and evaluate them accordingly.
For a specific contact, you can also set a different default document type in the contact details.
If you want to change the document type for several receipts at once, select them and open the context menu for the corresponding selection with the right mouse button.
Date
The document date of the receipt is entered as the date. You will find the payment date further down at the second last position.
Become a space pro
You can quickly adjust the date using the keyboard:
- You can “scroll” through the days using the up and down cursor keys.
- Use the up and down arrow keys while holding down the ⌥ key to “scroll” through the months.
- You don’t have to enter the complete date. For example, ‘1’ becomes the first of the current month and ‘1.2’ becomes the first of February of this year if the current date is after February 1, otherwise it is the date of the previous year
Amount and Exchange Rates
Receipts Space recognizes the amount (gross) and the currency.
If corrections are necessary, you can also set the gross amount by clicking on the “correct” fields. Or you can overwrite the amount field manually.
If the currency of a receipt differs from the set default currency, the amount is automatically converted from the foreign currency to the default currency at the current exchange rate on the receipt date.Currently, over 200 currencies are supported, including cryptocurrencies such as Bitcoin or “old” currencies such as DM. Euro, dollar, pound and yen characters are recognized in OCR documents. Intelligent currency detection prefers the standard currency as well as already confirmed currencies, if they are among the found currencies in the document.
Already used and confirmed currencies are fixed at the top of the drop-down list. The converted amount can be corrected manually, just like the gross amount of the document.
Tip
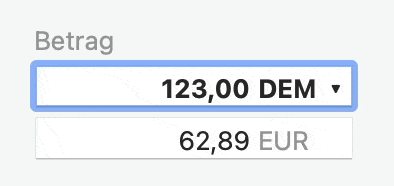 Enter currencies as a currency symbol or three-digit abbreviation directly together with the amount, e.g.
 $10 or 21.34 EUR.
Taxes
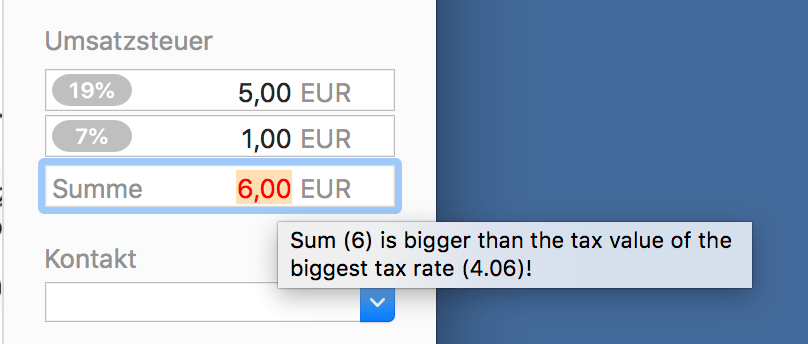 In the Settings you can adjust taxes (monetary amounts). As a rule, these are the VAT rates of your own country. These are also displayed in the input fields.
Each tax rate has its own field and a total is automatically calculated. By clicking on the coloured record in the input field, the value is automatically calculated from the gross amount. The value can also be set by holding ⌥ while clicking, whereby the assignment to the correct block is carried out intelligently.
If there are problems with the plausibility of the values, the total is highlighted in red. A tooltip in this field provides information about the cause of the problem.
Contact
For example, you can enter the name of the vendor, invoicing issuer, or a recipient. The app usually “learns” and “recognizes” contacts after the first assignment (automatic classification).
Become a space pro
The input field offers you quick input options:
- you can quickly create a new contact by typing the name in the field and confirming with Enter. The contact can be renamed or archived in the left sidebar.
- if you select the name in the PDF with the right mouse button, a dialog opens suggesting that you “accept the selection as a contact”.
- existing contacts are offered to you for completion when typing and can then be confirmed with Enter.
- the drop-down selection list shows you the existing contacts in which the letters you have already typed appear. You can also use the arrow keys to navigate through the selection.
- you do not have to pay attention to upper and lower case for the completion, and similar characters such as
öandoare interpreted as identical. For example,budisplaysbüro. - if you want to assign several documents to one contact, select them with the left mouse button and drag them all at once to the corresponding contact in the left sidebar.
- if you want to delete the contact, drag the selected receipts to “unassigned” in the contacts.
Contact level
To help classification with more specific data, you can add extended information to each contact. Using IBAN and international VAT ID, new documents can be assigned to a customer more reliably.
You can also assign a document type to a contact, which is then applied to automatically assigned documents. This can make it much easier to distinguish between vendors and customers.
You can edit these details in the left sidebar by selecting a contact and clicking the small gear icon on the right.
Category
Here you enter the category of the receipt. You can group receipts that belong together for you into one category for better clarity. Categories can be, for example, cell phone, expenses, internet, hardware, entertainment, car, refueling, etc. Another application example would be, for example, booking costs in connection with the transfer to the accounting department. However, only one category can be assigned to a receipt.
The automatic classification also takes place here: If the same category is assigned to a contact several times, the app fills in the fields in the receipt information accordingly. The field remains empty for different categories.
Become a Space pro
Can you assign contacts quickly? Perfect, it’s the same with categories!
Tags
With keywords or “tags” you can assign several characteristics to a document - in contrast to a category.
Keywords or tags of the files and higher-level folders are adopted during import. In this way, you can conveniently define some attributes automatically at file level using Finder. This is particularly useful in combination with the observed folders.
Become a space pro
You can set tags in almost the same way as contacts and categories.
There is no drop-down menu (4) to give you more flexibility with tags.
For the last point (7. Delete the assignment by dragging to “not assigned”), please note that all tags are removed. If you want to remove only a specific keyword from receipts that have multiple keywords assigned to them, drag the selected receipts to the keyword you want to remove while holding down the ⌥ key. There may also be receipts in the batch that do not contain the keyword you want to remove.
Note
Enter additional comments about your document here. These are not “bundled” like categories or tags and displayed for selection or completion and therefore offer you more flexibility.
Comments on the files are adopted as notes during import. You can also transfer markings from the PDF as a note using the right mouse button.
Paid
Here you can enter the payment date for income and expenses. This is not available for documents. Of course also for several receipts at once.
When importing from MoneyMoney, the payment date is automatically transferred.
Please note
The filing in Receipts Space follows the debit taxation by receipt date. For smaller companies, actual taxation by payment date may be relevant. You can read how to adjust this in the settings under “relevant” date
Direct payment
Receipts Space automatically recognizes existing bank details in the receipts. This data on amount, IBAN and contact maintained in Receipts Space can be used to create bank transfers. Under Templates you can define your individual purpose for online banking.
You can also store an IBAN for existing contacts by selecting a contact in the left sidebar and clicking on the small wheel on the right.
The following apps will help you to pay your bills quickly. To do this, click on “Pay directly” at the bottom of the right-hand receipt information field and select one of the apps.
You can also right-click on markings in the PDF to mark them as the intended purpose and then click on “Direct payment with marking as subject” to initiate the payment process via MoneyMoney or SEPA.
MoneyMoney
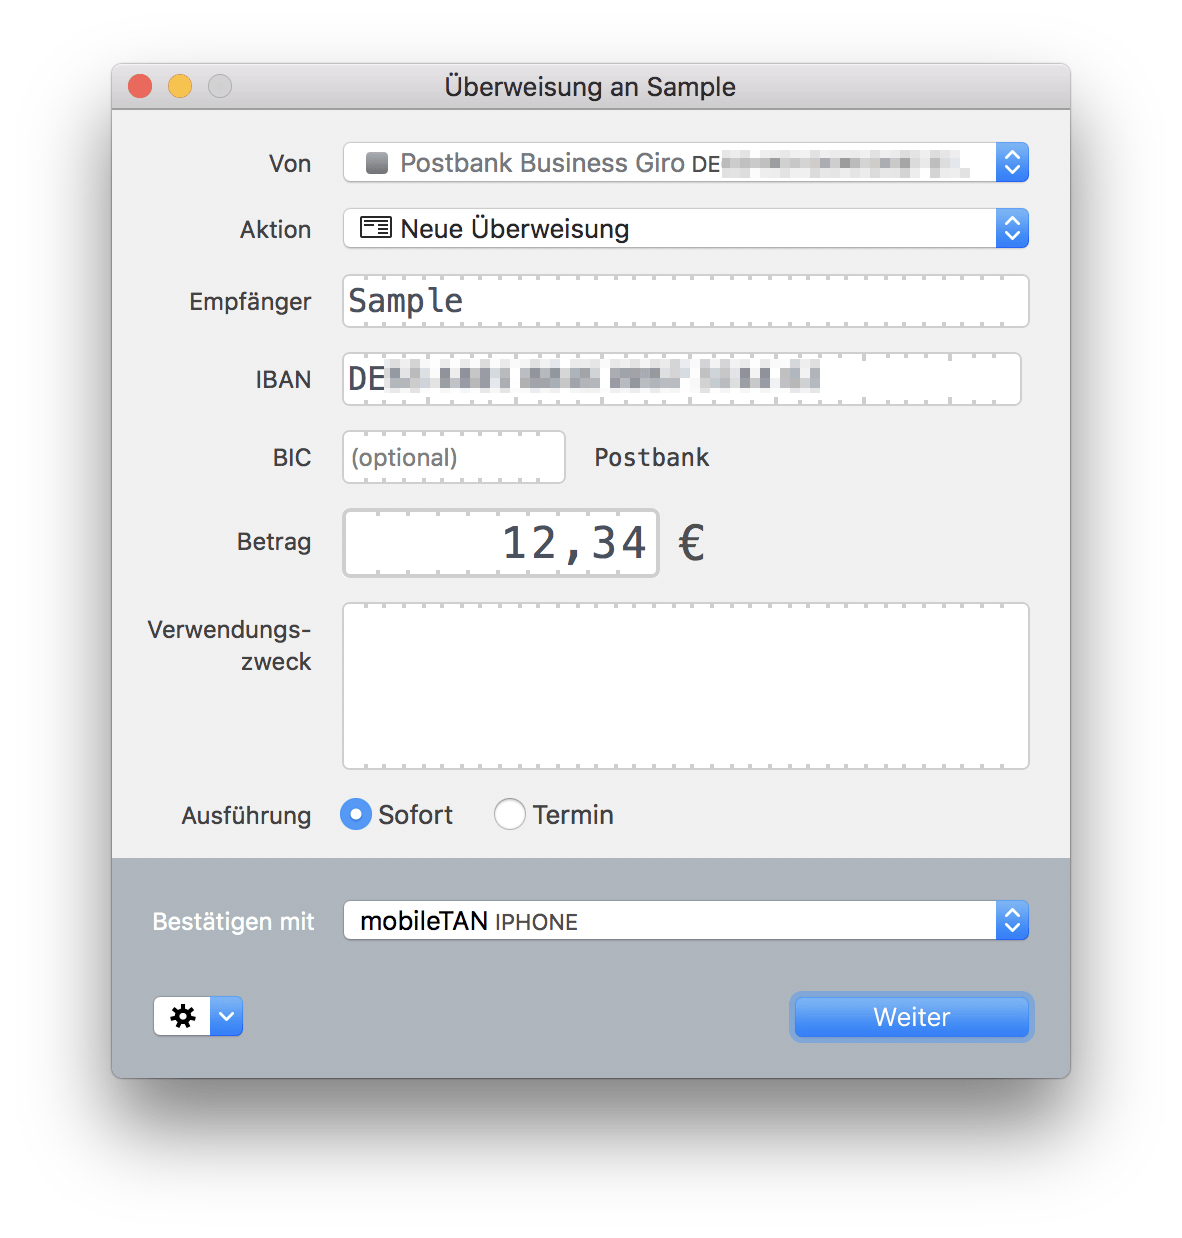 With MoneyMoney you can not only pay your bills quickly, but also keep an eye on all your bank accounts.
You can also benefit from MoneyMoney the other way round: you can simply drag and drop existing bookings into Receipts Space as placeholders via D&D and simplify your receipt entry.
 SEPA
SEPA
The XML format standardized by ISO 20022 for SWIFT/SEPA transfers is also supported by Receipts Space and can therefore be used in numerous programs or in some cases directly at the bank.
To use this format, you need to enter your sender data. To do this, enter your name and your IBAN in the Settings.
 GiroCode / SEPA QR Code
Most European banking apps support the reading of SEPA QR Codes on mobile devices. Clicking on “Pay directly” opens a pop-up that displays the corresponding QR code for the current receipt. You can now read, check and confirm this directly from the screen using the corresponding function in the banking app.
https://video.holtwick.de/w/v3DrejuhjVJANhcCQt41sPTitle
When importing, the name of the original file is set as the title by default. Change the library settings if you always want the invoice number to be used as the title.
You can also manually overwrite the title of individual receipts or use the right mouse button to select markings in the PDF and set them as the title.
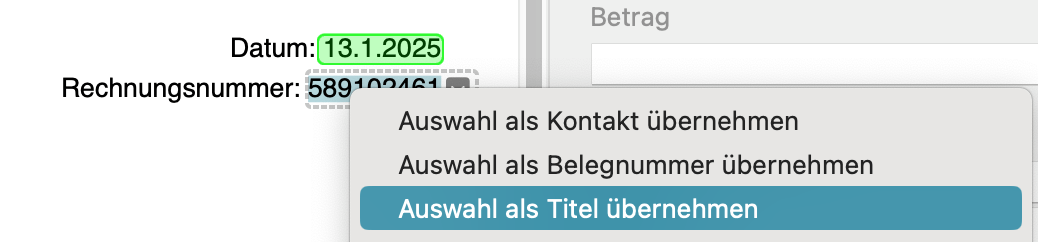
Reference
The reference is used to identify the receipt in your accounting system. If you confirm your receipt, a new reference is automatically set (if you have not previously set one manually). You can define this counter yourself in the Settings. Please note that reference numbers are strings and not numbers. To achieve sorting, set enough zeros in the counter.
A mark in the PDF can also be set as a reference number via the context menu.
ID
Each entry has a unique ID consisting of letters and numbers. This ID is relevant for audit-compliant processing.
Confirmation
All imported documents are initially unconfirmed. Most values are already captured using Text recognition and Content analysis. For e-invoices in XML or ZUGFeRD format, the relevant information is set automatically.
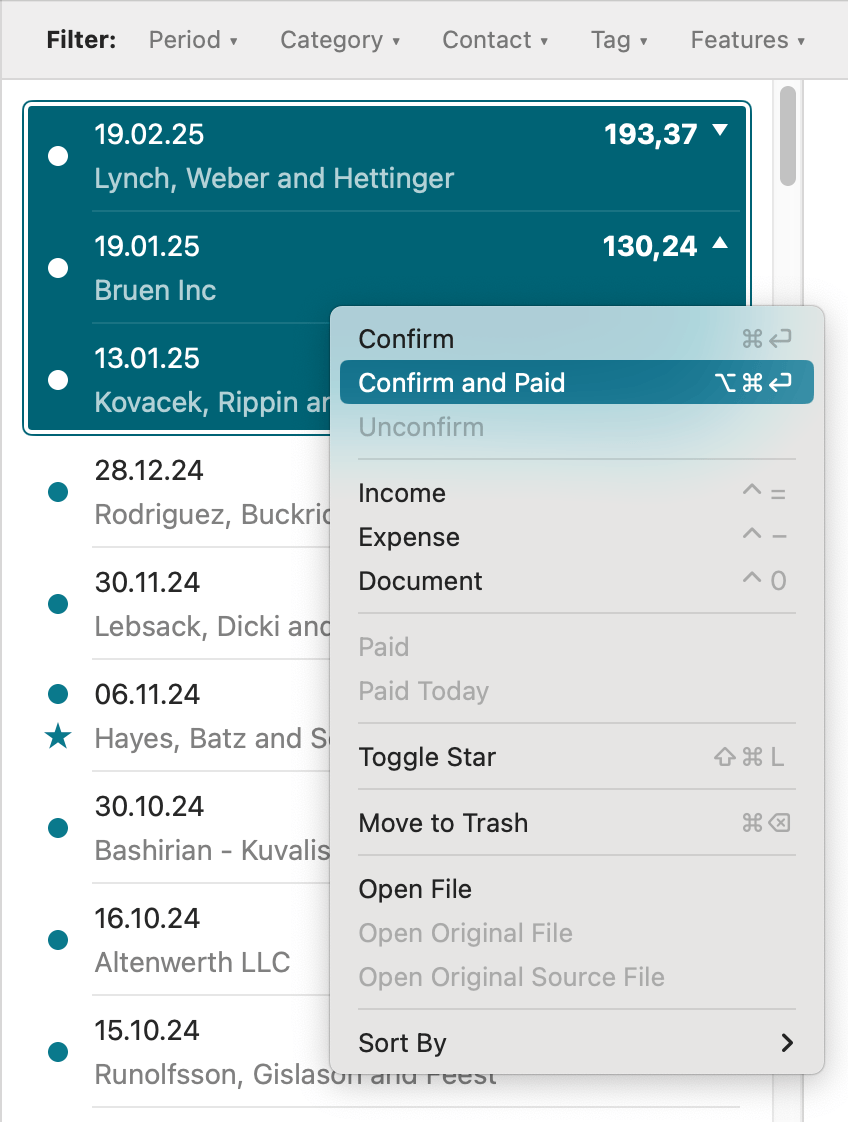
Nevertheless, it is advisable to check and, if necessary, supplement the content and confirm it. You can do this by clicking on the “Confirm and continue” button at the bottom right. The next unconfirmed document is then selected so that multiple documents can be confirmed quickly. You can open a dialog box to “unconfirm” using the right mouse button.
If you have activated “Audit compliance” in your library settings, entries are “closed” with confirmation and thus specially protected. With the exception of “tags”, “notes”, and “markings”, all document information fields are write-protected to prevent unwanted changes. The entry can be made writable again, but this will be logged.
Become a Space pro
If you press ⌥ during confirmation, the current date is automatically set as the payment date. This works in combination with ⌘ ↩ as well as with a mouse click.
Merge receipts
Combine multiple related documents or receipts with just two clicks: Simply select multiple receipts and right-click on the “lead receipt” to select “Merge in this entry” from the context menu. This is helpful if, for example, you want to link imported placeholders from MoneyMoeny directly to the corresponding digital receipt or highlight the relationship between the order confirmation, delivery note, and invoice in a single entry. Technically, the leading entry is supplemented with the information and PDFs from the others. The “non-leading” entries end up in the trash.
History
Every change to your data is logged. You can open the history view via the icon at the bottom right. It shows you what was changed, when, and by whom (see Display name for changes).
For contacts, categories, and tags, you can click on the name to set the corresponding filter. For changed files, you can click on the name to view the previous version.
Using the export function at the top right, you can download the raw data (JSON) of the change history.
This view supports audit-compliant work.
Work with Receipts Space
Search and Filter
In the window at the top right you will find the search field in which you can enter partial terms separated by spaces.
Become a space pro
Observe the following rules when searching and filtering:
- Terms
- Capitalization is not relevant.
- Several partial terms are linked by AND, i.e. a hit is only returned if all conditions are met.
- The search is based on words, i.e. when searching for ‘invoice’, ‘invoice amount’ is also found.
- The contents of the files, title, note, contact and category fields are searched.
- Expressions enclosed in quotation marks
"are found as a whole, e.g."vat number". - Preceding
-excludes corresponding hits, e.g.-house.
- Numbers such as
1,23or1.23represent amounts.- Prefixed
<,>,<=,>=or=correspond to comparisons, e.g.<100shows all amounts under 100. - Preceding
-or+corresponds to expenditure or income, e.g.>+100income over 100 - When searching, whole numbers also find values with any number of decimal places, e.g.,
100also finds100.23.
- Prefixed
- Preceding
$orcategorysearches for hits in categories, e.g.$internetorcategory:internet. - Preceding
@orcontactsearches for hits in contacts, e.g.@telekomorcontact:telekom. - Preceding
#ortagsearches for hits in keywords, e.g.#privatortag:privat. - Preceding
idoruidsearches for matches in ID, e.g.,id:R7W1DdjSQ8SlfDnIT6h1MQ.
In the sidebar on the left, your receipts are displayed according to certain characteristics as well as time periods, contacts, categories and tags.
If you want your search term to be retained when you change, hold down ⌥ when clicking with the mouse.
You can further narrow down the selection in the sidebar by setting a filter in the middle area of the window.
Sidebar
 The left sidebar helps you to narrow down your entries based on their characteristics and gives you quick access to the sorted content. You can adjust the width of the sidebar by clicking on the right edge and dragging.
All
At the top - under ‘All’ - you will find all entries except for those in the Trash.
Unconfirmed
All receipts that are unconfirmed are displayed directly underneath. You can find more details on Confirm above.
For the sake of clarity, unconfirmed documents are marked with a filled-in dot both in the sidebar on the left and in the column view at the top.
Not Paid
Receipts with outstanding payments are listed here. Receipts for which no payment date has yet been set.
Not paid receipts are marked with a circle. Red circles indicate that the (document) date is already 14 days back, orange 10 days.
Marked
You can also mark entries with a star, e.g. to remind you of outstanding additions or to indicate a particular importance for you.
You can use ⇧ ⌘ L to quickly change the markings using the keyboard. This is also possible via the context menu, which you can open with the right mouse button. This works not only for individual documents, but also in a batch for all marked entries.
Placeholder (without file)
This overview shows you entries that do not contain a PDF. These can be e.g. empty entries after Import from MoneyMoney or via the main menu Insert of an “empty entry” (⌘ N). You can simply add receipt files by dragging and dropping them onto the placeholder area. After importing from MoneyMoney, this view helps you to assign the receipts more quickly.
Recent Imports
This view shows the imports of the last 24 hours before the last imported document. This means you can always see which documents were last imported.
If the view is too cluttered for you: You can reset the list via the context menu using the right mouse button (or set it back to the 24-hour view described after emptying).
Trash
Before an entry is finally deleted, it is placed in the trash. If a document has been placed in the trash by mistake, you can restore it using the right mouse button.
Journal
Your receipts are displayed in the journal according to time criteria. Depending on the setting, the document or payment date is used as the relevant date.
Calendar years form the top level, below which one of the following structures appears, which you can adjust in the main menu under Display > Journal or via the context menu:
- Months
- quarters
- tertials
- semesters
- calendar weeks
Contacts, Categories and Tags
Your receipts are displayed according to the relevant criteria - contacts, categories and tags.
By clicking on the contacts, categories or tags, you can rename or archive them. Immediately after the action, you can use Undo (⌘ Z) to restore deleted items. The assigned documents are not deleted, but appear under “not assigned” or under the other tags.
You can also enter comments and the IBAN for contacts.
Become a Space pro
You can customize several documents at once:
- All changes via the context menu, which you open with the right mouse button, can be carried out in batch if you select the respective documents beforehand.
- You can also set the respective values in several entries by selecting them and then dragging them to a contact, a category or a tag in the sidebar.
- If you want to delete a specific tag from receipts to which several tags are assigned, drag the selected receipts to the tag you want to remove while holding down ⌥. There may also be documents in the batch that do not contain the tag to be removed.
Archive
 Archived contacts, categories and keywords can either be grayed out or hidden. If the eye symbol at the bottom of the sidebar is crossed out, archived contacts, categories and keywords are hidden. You can make them grayed out again by clicking on the eye. The content and its relationships remain completely intact, only the overall clarity of your sidebar is improved. Archived contacts, categories, and tags are no longer automatically assigned to new receipts.
The context menu for contacts, categories, and tags allows you to archive them in batches if no entries are assigned to them.
List Views
 Your entries are displayed in lists - all or limited via the sidebar.
You can perform various functions by opening the context menu of one or more entries. If you press ⌥ when the menu is open, you can also view the storage locations of the documents.
With ⌘ ↑ / ⌘ ↓ you can navigate quickly through your selection.
You can choose between two views using both the ‘View’ menu and the toolbar:
Side List View
In the “Side list” view mode, your - possibly limited - entries are listed on the left, one below the other. A Dashboard appears on the right, which also refers to the selection via the sidebar. If you select several entries here, the dashboard will also be displayed. If you click on an entry, the corresponding PDF with the document information field is displayed on the right. You can adjust the width of the sidebar by clicking and dragging.
For each receipt, the relevant date, the amount in the default currency, and the document type are displayed at the top. In the bottom line you can see the contact and - if available - the amount in the original currency. The left-hand marking for “unconfirmed” or “unpaid” and the optional marker round off your quick overview.
Top List View
The classic view in the column format offers you additional and individual information. Right-click on a column header to open the context menu, which you can use to show or hide columns. You can also change the sorting by clicking on the respective column header.
Otherwise, this column view behaves like the other view mode in relation to the dashboard or single view. You can also change the height of the list by clicking and dragging.
Overview your receipts
Receipts Space offers you various analysis and processing options. Not only can you quickly see what has been going on in a certain period or with a particular customer, you can also process this information and use it for your accounting, for example.
Become a Space pro
All evaluations and processing options always refer to your current selection via the sidebars, sorting, filtering and/or marking.
Dashboard
When selecting via the sidebar, setting the filter and if more than one entry is selected, a dashboard is displayed.
The dashboard gives you a quick, detailed overview of the income and expenses recorded with the selected receipts:
- Total amount, income and expenses, as well as “unpaid” amounts with taxes, net amount, and number of respective receipts.
- Documents are not taken into account here.
- Bar chart with income (green) and expenses (red) by month or year (depending on selection).
- Compared to the previous same period, the trend shows how your figures have developed.
- The title of the dashboard is automatically set appropriately, but you can also change it to make your printout even more meaningful.
- One pie chart each
- by income and expenditure
- for the categories and contacts.
- Up to 10 segments are used, sorted by size in descending order, whereby the last segment may be the sum of the remaining smaller entries.
- The summarized entries can be displayed by clicking on them.
- The bar and pie charts show the sum of the gross amounts. You can change this to net amounts by ticking the corresponding box at the bottom left.
- If there are too few values, individual individual charts will be hidden.
- Income and expenses as well as the total amount of entries to which tags have been assigned are displayed in a table. Please note that multiple keywords can be assigned to a single receipt.
- Clicking on the name of a group (contact, category, or keyword) selects it in the sidebar. Clicking while holding down the ⌥ key sets a corresponding filter.
- Clicking on the amounts and taxes copies them to the clipboard.
Export
Various export functions are available at the bottom right of the screen for further processing of the information and receipts if you are not in the individual view of an entry.

In the “Export” menu, you can select which content you want to export on the left. This will be stored in “Documents.” Check the box next to “Create export folder” if you want the export to be stored in a folder. Please also consider creating subfolders in the templates. Furthermore, by checking the box at the bottom left, you can also save your export as a compressed ZIP file or display it directly in Finder.
Apple App Store Version
In the App Store version, exports are always stored in a folder, so the “Create export folder” option is not shown there.
Receipts as PDF file
For further processing by e.g. your tax consultant or for transfer to DATEV, it can be helpful to export the receipts for a specific period.
As a rule, the original PDF that was imported is exported. For other import formats, the created PDF is exported.
However, you can also optionally click on the formatted view. You can display document information defined in the Templates in the margins of the PDF. Technically, however, this is no longer the original PDF.
You can also choose whether a PDF should be saved for each receipt or a combined file for all receipts. You can define the file names for the former in the Templates. A combined file, on the other hand, is simply called receipts.pdf.
By dragging one or more entries onto the Finder, copies of the corresponding PDF files are created. This also works with many other applications and also by copy and paste.
Original Source File
When exporting the original source, you will find the corresponding originals that were not PDF files, e.g. XML invoices or emails.
Excel file
The data from the receipt information is exported in column form as Microsoft Excel - optionally with individual data sheets per category. You can also choose whether the sign should be displayed according to income and expenses so that total formulas produce meaningful results during further processing.
CSV
Last but not least, you can also create a CSV export, a universal format that is understood by all spreadsheets.
JSON
JSON, a detailed data format that is mainly used for further processing in self-developed programs or scripts, is also supported. The same schema is also accepted as JSON import, so export and import are round-trip compatible.
DATEV
Please note
This is a specific feature for users from Germany. To learn more about visit the German documentation.
Columns
Customize the columns for the export to Excel and CSV to your requirements in the export menu on the right:
- Show or hide the columns using the checkbox.
- Rename the column headings by double-clicking on them.
- Sort by dragging the column headings.
Report
In the “Report”, your entries are prepared in tabular form for printing or saving as a PDF. You can give the document a title and display totals and signs. You can also configure the columns in the same way as for Excel or CSV export. Even if you can set a landscape format, you should not select too many columns for the sake of clarity. If you do not have enough space, it is better to choose the Excel export. You can add documents to your report in simple or formatted form.
To quickly print individual documents or the current selection, you can also use key combinations: ⌘ P for normal printing or ⌘ ⌥ P for formatted printing as described above. In addition to a physical print, you can also use the options of your printer dialog, e.g. save as PDF or send by mail.
For double-sided printing it makes sense to fill the gaps in single documents with an odd number of pages with blank pages: Additionally press ⇧. Both in the main menu and with the key combinations.
Share
You can use the macOS “Share” feature in the toolbar to send your documents to other programs.
Conversely, it is also possible to post files from other programs to Receipts Space as an import option.
Integrations
 Export to Steuererklärung.app
Integration with Steuererklärung.app helps you prepare the VAT advance return in Germany.
In the Dashboard, a “VAT” button appears next to “Report” and “Export” if Steuererklärung.app is installed on the same Mac.
This button opens Steuererklärung.app and fills in the VAT amounts in the corresponding places of the form. The time period is also recognized and included.
You may still need to fill in additional fields manually before you can submit the data to the tax office.
Export to GrandTotal (Invoicing)
For example, you can use entries from Receipts Space in GrandTotal for expense accounting. To do this, select the desired entries in Receipts Space and copy them using ⌘ C or via the menu under Copy. The values can then be pasted in GrandTotal in the item view of a new invoice.
Appendix
Still on Receipts 1.x
You are still running Receipts 1.x and looking for the manual? Then go here…
Error messages
File not found
Please read the error message carefully. In most cases, you will find a useful explanation there. For example, the connection to a network drive may be interrupted or file synchronization may not yet be complete. If the file is indeed no longer available in the library, the problem may be due to a technical synchronization issue (iCloud, Dropbox, etc.). Please resolve this issue or switch to a different service. If the problem persists, please contact our support team.
Checksums do not match
This error means that although a file exists, it is obviously not the one that is expected there. A checksum is calculated for every file that is added to the system. If this no longer matches during a later comparison, the file has obviously been changed or replaced. Rule out the possibility that your sync service or other copying activities caused the problem. If necessary, you can repair the library and the checksum will be adjusted to the found file.
Empty entries
In earlier versions, empty entries were sometimes created, which reappeared during subsequent imports. These are now recognized and automatically moved to the recycle bin. We are not aware of any data loss in this context.
Frequently asked questions
Why does loading take so long?
Sometimes it is necessary to reload the entire library. This is the case, for example, when a new version has been installed and functions in the app have changed. But also when a library is loaded for the first time, or when a complete reload has been forced by ⌘ ⌥ S.
This process is not usually performed often, and the following startups will be a lot faster. It will only rebuild on every launch if you have enabled cleanup.
Are there interfaces for developers to the app?
There are various interfaces (API) for developers to the app in different formats such as JSON. The app can be accessed directly via AppleScript, URL scheme, or watched folders. A complete overview together with the field reference for the JSON import is available under Interfaces. All developer materials can be found on GitHub holtwick/receipts-api. The data itself can also be read and modified directly via the library GitHub holtwick/receipts-space. If you have any further questions, please contact our support team.